◈ RNN의 모든 hidden state vector 사용하기
✅ RNN 정리모든 hidden state vector 사용하기
✔ 기존 RNN의 문제점

•일반적인 신경망의 은닉층은 한 번만 적용이 되지만, RNN 층은 이전 단계의 히든 벡터를 다시 입력받는 과정을 반복한다.
따라서, 입력 층에서 가까울수록 출력된 hidden state vector (h0, h1, h2 ....)의 정보가 적게 반영된다.

일반적인 텍스트 데이터는 문서의 앞 부분에 핵심적인 내용이 포함되어 있는 경우가 많기 때문에 일반 RNN을 사용하면 중요 정보를 제대로 학습하지 못할 수도 있다. 따라서 모든 단계의 hidden state vector의 정보를 모두 사용할 필요가 있다.
✅ Hidden state vector 결합 방법
RNN에서 총 T 번의 time step이 있을 때, 여기서 출력되는 결과를 종합해서 Dense Layer에 전달해야 한다. 이 과정에서 필수로 1차원 형태로 변환해야 한다(Flatten 작업) . 이 방법에는 두 가지가 있다.

① Concatenation : 이어 붙이기
각 RNN층의 j개의 노드가 있고, 총 T개의 레이어가 있다. 이를 거치면 j차원의 hidden state vector가 T개 도출된다. 이를 세로로 concat 하면 1차원으로 변환할 수 있다. 위와 같이 이어 붙이면 (jxT)x1 형태의 1차원 벡터가 도출되고, 이를 Dense Layer로 전달할 수 있다.
②Mean : 평균

각 hidden state vector를 가로로 나열하고 평균을 구해서 j 개의 차원으로 구성된 벡터를 구성한다. 이를 다음 레이어의 입력값으로 전달할 수 있다.
◈ IMDB 데이터 활용한 실습
✅ Concat 방법
#데이터 불러오기
import tensorflow as tf
from tensorflow.keras.datasets import imdb

max_features = 10000
(x_train, y_train), (x_test, y_test) = imdb.load_data(num_words=max_features)

from tensorflow.keras.preprocessing import sequence
max_len = 100
x_train = sequence.pad_sequences(x_train, maxlen=max_len)
x_test = sequence.pad_sequences(x_test, maxlen=max_len)


#원 핫 인코딩
from tensorflow.keras.utils import to_categorical
y_train_one_hot = to_categorical(y_train)
y_test_one_hot = to_categorical(y_test)
IMDB 데이터를 불러오고 각 문서의 길이를 맞춘 후에 종속변수의 원 핫 인코딩을 실시한다. 이후 예제 코드에서 이 과정은 모두 동일하다.
model = models.Sequential()
model.add(layers.Embedding(max_features, 64, input_length=max_len))
model.add(layers.SimpleRNN(32, return_sequences=True)) #concat 하는 부분
model.add(layers.Flatten())
model.add(layers.Dense(16, activation='tanh'))
model.add(layers.Dense(2, activation = 'softmax'))
model.summary()
“IMDb_RNN_return_seq_true_concat.ipynb”
위 모델은 RNN 층을 하나만 생성했으며 32개의 노드가 있다. 즉, hidden state vector가 32차원이다.
#컴파일
from tensorflow.keras.optimizers import RMSprop
model.compile(optimizer=RMSprop(learning_rate=0.001), loss='binary_crossentropy', metrics=['acc'])

#모델 학습
history = model.fit(x_train, y_train_one_hot, epochs=10, batch_size=64, validation_split=0.2)

#결과 확인 : loss
import matplotlib.pyplot as plt
plt.plot(history.history['loss'])
plt.plot(history.history['val_loss'])
plt.xlabel('epoch')
plt.ylabel('loss')
plt.legend(['train','val'])
plt.show()

#결과 확인 : accuracy
plt.plot(history.history['acc'])
plt.plot(history.history['val_acc'])
plt.xlabel('epoch')
plt.ylabel('accuracy')
plt.legend(['train','val'])
plt.show()

#test set 정확도 확인
test_loss, test_acc = model.evaluate(x_test,y_test_one_hot)

print('test_acc:', test_acc)
이후 모델 컴파일과 학습을 실시한다. 최종 정확도를 살펴보면 accuracy 76% 정도임을 알 수 있다.
“IMDb_RNN_return_seq_true_mean.ipynb “
✅ Mean 방법
위의 예제에서 전처리 부분 코드는 동일하다.
from tensorflow.keras.layers import Input, Embedding, LSTM, SimpleRNN, Dense, Lambda
from tensorflow.keras.models import Model


# Headline input: meant to receive sequences of "max_len" integers, between 0 and 10000.
main_input = Input(shape=(max_len,), dtype='int32')

# This embedding layer will encode the input sequence
# into a sequence of dense 64-dimensional vectors.
x = Embedding(output_dim=64, input_dim=max_features, input_length=max_len)(main_input)

# A SimpleRNN will transform the vector sequence into a single vector,
# containing information about the entire sequence
RNN_out = SimpleRNN(32, return_sequences=True)(x)
# this will return 100x32 for a document

# 평균을 구함 => 하나의 문서에 대해서 32 차원 벡터 출력
out = Lambda(lambda x: tf.math.reduce_mean(x, axis=1))(RNN_out)

x = Dense(16, activation='relu')(out)
main_output = Dense(2, activation='softmax')(x)
model = Model(inputs=main_input,outputs=main_output)
model.summary()

concat 과정과는 코드가 다르므로 주의.
◈ Stacked RNN (여러 개의 RNN층 사용하기)

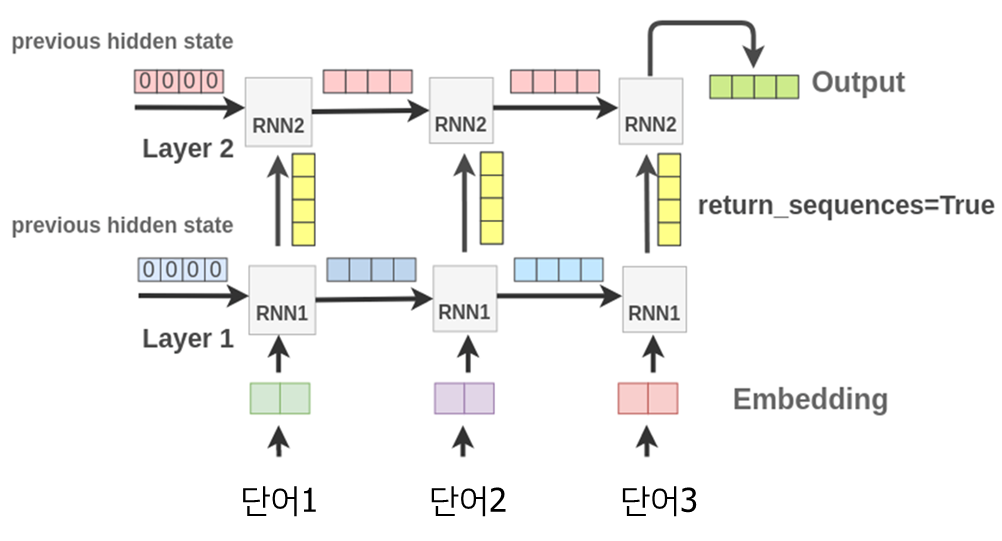
RNN층을 여러개를 쌓아서 예측 성능을 향상시킬 수도 있다.
첫 번째 레이어의 각 RNN층이 전달하는 hidden state vector를 두 번째 레이어의 RNN층에서 입력받는 방식.
즉, 두 번째 레이어에서는 입력되는 시퀀스 데이터의 종류가 이전 레이어의 히든 스테이트 벡터가 됨.

return_sequences 파라미터를 반드시 True로 설정해야 한다. 일반적인 RNN 모델의 디폴트 값은 False인데 위와 같이 마지막의 hidden state vector만 반환된다.

두 번째 레이어에서 return_sequences= True 로 설정하면, 마찬가지로 두 번째 레이어에서도 각각 히든 스테이트 벡터가 산출되고, 이것을 세 번째 레이어로 넘길 수도 있다.
✅ Stack RNN 예제 코드
# 모델 구축
model = models.Sequential()
model.add(layers.Embedding(max_features, 64))
model.add(layers.SimpleRNN(64, return_sequences=True)) #파라미터 True로 설정
model.add(layers.SimpleRNN(32)) #RNN 층 추가
# model.add(layers.Dense(16, activation='tanh'))
model.add(layers.Dense(2, activation = 'softmax'))
model.summary()
라인 4의 return_sequences 파라미터를 반드시 True로 설정한다. 그래야 위의 그림에서 노란색으로 표시된 hidden state vector를 산출한다. 만약 False 인 경우(디폴트 값) 가장 오른쪽에 있는 최종 hidden state vector만 전달된다.
라인 5에서 RNN층을 하나 더 추가한다.
◈ Reference
• 연세대학교 디지털사회과학센터(CDSS) 파이썬을 활용한 딥러닝 기초 워크숍, 이상엽 교수님
'머신러닝, 딥러닝 > 딥러닝' 카테고리의 다른 글
| Transfomer 기본 개념 정리 (2) | 2022.01.20 |
|---|---|
| LSTM, Bidirectional LSTM (0) | 2022.01.19 |
| CNN을 이용한 텍스트 분류 (0) | 2022.01.18 |
| CNN 사전학습 모델을 이용한 이미지 분류 (3) | 2022.01.18 |
| CNN 사전학습 모델 - LeNet / AlexNet / VGGNet / InceptionNet / ResNet / DenseNet / MobileNet / EfficientNet (0) | 2022.01.17 |


댓글